Monday, January 31, 2011

More fleeces

Fritillary does not want to pose for a picture
Here's a few more fleeces for your consideration. If you see one that strikes your fancy just leave a comment and I'll reserve it for you.

This evening I'm listing Fritillary's (those of you who follow the etsy store know the story of her first shearing yarn) This will be her second shearing. The first netted six skeins of super soft single ply, that I then plied with dyed wool into a super nice yarn.

I expect her to shear 2-3 pounds of nice kid mohair curls with a 3-4 inch staple. No promises, just educated guessing. She has not been wearing a coat (you try to keep a coat on a fat little butterfly goat!)

Fritillary's fleece, still attached
Her well skirted fleece will be $14/lb.

Nessie

Thyme, with her daughter Nessie behind her.
 Finesse, fondly known as Nessie, is a fine, delicate beautiful little Jacob sheep lamb. She is the daughter of our oldest ewe, Thyme. She is a bit inbred and was not a planned baby. Thyme had other plans than ours and had Nessie when she was 11-years-old last spring. Nessie's sire is Dapper Dan, who is out of Basil, Thyme's other daughter in our flock.

Nessie's baby fleece looks locky and will probably weigh in at less than 2 pounds when skirted.

Her fleece will be $12/lb.


Chalcedony, our one icelandic ewe

Chalcedony
 Chalcedony is our one purebred icelandic ewe. She is a beautiful sheep. She has the triple layer fleece that is common to all icelandics and she has to be sheared twice a year. This spring I expect her  fleece staple to be about 9 inches because I sheared her early in September.

She tends to put on way too much weight and the heat is hard on her.

She will likely shear 6 lbs and I will split this fleece into one pound lots if requested. The under coat is downy and felts easily. The long outer locks are beautiful, but not soft.

Her well skirted fleece is $14/lb

Broom beginnings


This time of year, when the sap is down in the roots and the bugs are asleep, we go stick gathering for Shawn's broom making. We have to cut the 1,000 plus broom handles he'll need for the whole year in late January or February, when the conditions are right. So we spend any available daylight hours either in our back wood lot or up in the National Forest. Shawn gets a permit that says exactly what he can cut in the forest. It helps to keep the undergrowth down and improves the health of the mid-sized trees when he clears out the saplings for broom handles.

Of course, this gathering is not as easy as it sounds. Our back wood lot is very over grown. This honeysuckle patch will make you swoon with its sweetness in summer and sigh with frustration as you try to navigate it to get into the woods in winter. Honeysuckle creates the highly sought after twisted stick broom handles. So we plow through.

But it's the cat briar, honey locust and wild rose that are the real terrors. Shawn wears leather in the woods and I suit up in a nice slick nylon jacket. Lena likes to wear a tshirt and bears the battle scars.


They cut and I pile the sticks in "easy to find" locations to come back to - we hope.

We know there was another stash back there somewhere!


A weekend's worth of stick gathering, and one cool rock Lena found.


Sunday, January 30, 2011

Fleece reservations

On a side note, I just saw that yesterday's post was the 200th I'd written on this blog. There might just be some kinda book in here someday!

I am starting to take reservations for our 2011 fleeces. Thyme's fleece and one of the kid mohairs are already reserved. We will be shearing the week of March 29th and should have all fleeces skirted and ready to ship by April 15. We will skirt them and pick out the worst vm, but we have not put coats on most of the critters this year, so the fleeces will not be as clean as they have been in the past. We are still fighting cockleburrs and so you might find the occasional one.
I will be happy to email pics for your approval of the fleece after we shear and I will send you a paypal invoice for the fleece cost plus shipping before we ship. If you have any questions, or want to reserve a fleece - email me at jenonthefarm @ gmail . com

Visit us for our Shearing Days event March 29-31 to pick out your own fleeces from the ones that aren't reserved and take them home with you. email for more info.

The price for most 2011 raw fleeces -
Jacob wool - $12.00/lb
Chocolate corriedale cross fleece - $10.00/lb
White icelandic - $12.00/lb
Prime wool fleeces - $14/lb (especially cool colors and textures and only one of each!)

Mohair -
Kid - $14/lb (choice of pewter or silver)
Adult fine - $10/lb
Adult coarse (rugs or...) $8/lb

Also, we will have a few fiber wether sheep, ewes and older angora goat does for sale. After lambing and kidding we will have dairy goat kids and lambs for sale. Let me know if you are interested.

I'll list a few a day, so just keep an eye to see which on you want, or send a request to see a particular fleece.

Dixie's fine mohair -
Dixie

Dixie

Flash

Flash's wild wool

Cowslip's boy

Dixie is a coming three year old angora doe. Her fleece is a fluffy medium gray and still spinnably fine. The hat I wear all winter is made from Dixie's fleece.

Dixie usually shears about 3 pounds, though this spring's fleece seems a bit light. Her staple is usually 3-4 inches.

Dixie's fleece can be reserved for $10/lb


Flash's Wild Wool -


Flash is Pennyroyal's son and he will be remaining in our flock as a fiber wether. His fleece is currently almost 9-inches long and very locky.

His coloring is pretty uniform white and chocolate.

Flash is a 2010 lamb and this will be his first shearing. I expect about 2 lbs of skirted fleece.

Flash's fleece is available to reserve for $14/lb


Cowslip's boy -


Cowslip has the Corriander line of spongy soft fleeces. This year she had twins by Dapper Dan, who is out of our locky line of fleeces. This boy seems to have a good curly combination of both.

His fleece is dense and he is a good sized lamb. This will be his first shearing and I expect about 2 lbs of skirted wool.

He is for sale as a fiber wether after shearing for $75.00

His fleece is available to reserve for $12/lb.

Saturday, January 29, 2011

Creativity in progress

Blue carded wool, blue mohair yarn balls, blue uncarded wool
blue hand spun 2-ply wool, blue and natural pewter handspun
wool and mohair two-ply yarn. 
This has been one of the most successful weeks of my personal professional life. I have accomplished or set in official motion projects that I have been working on for three or more years. I have presented proposals, gotten approvals taught classes and relaxed by spinning beautiful blue yarn.

Last evening, I went with several girl friends to help pack up house for a coworker who is moving to another park. We had fun and accomplished a lot. When I got home I was tired and listened to myself share worries about the upcoming year with Shawn as I carded and spun blue wool.

This morning, I have a few minutes of down-time to think over the week. I decided I really needed to write down and celebrate the amazing week I'd just had, just to keep the accomplishments from getting buried in the fuss and worry of life.

The week started with my getting approval to present a draft of a project that I have been researching, gathering information on, tweaking and finalizing since before I was Craft Director at OFC. Every year I have run the idea and information by my boss and gotten told it just was not complete enough, or that this was not the time. Now, the time was right, the info was there and I could start this wonderful concept on its way through the approval process. I really liked the proposal I wrote up. Shawn, in his much appreciated roll as my production manager, did some great charts and helped me get the numbers real. If this gets approved, it will dramatically change our 2012 season at OFC. If we get preliminary approval, we can start on the budgeting process for it next week.

Then I finally taught my super fun Traditional Winter Foods cooking class. I had a great group of students and we had fun and made delicious food.

The weather turned sunny and astoundingly gorgeous. I am coming to appreciate my office for its windows. Even when I can't be outside, I can still have the inspiration of the natural world.

Wednesday was devoted to catching up on projects and paperwork. The Quilt Retreat is going to be great fun this year, with almost 30 quilters already signed up. Our adult craft class morning on Feb. 12 is filling up and the Bluegrass craft show is so full, I don't know where I'm going to put everybody. I really need to get some top notch publicity out about that one!

Joanne Webb, lifetime member and supporter of the Arkansas
Craft Guild, Stone County and so much more. I will miss
your smile and sweet voice.
Thursday was in inspirational day. I am on the board of the Arkansas Craft Guild. This guild is the longest continuously running craft guild in the US. But, it has been suffering the same economic stresses as the rest of the country. We have made some changes there and are going to have the guild gallery open on Friday and Saturday only through March 5, with all volunteer help. People have been stepping up to the plate and the whole process is enough to make you positive about people!! We are opening the Joanne Webb Coffee Room in the Gallery, in honor of a truly wonderful lifetime member who passed away this week. I will miss her terribly, but now will be able to think about her every week as I visit with friends in the coffee room.

Then, yesterday, in Little Rock, I got to present another proposal that was the culmination of 3-years of work and planning. We are going to have a Glass Shop at the Ozark Folk Center!!! Thanks to the generosity and planning of the Ladies of the Committee of 100 and to Sage Holland, Beau Anderson and the help of OFC Superintendent Grady Spann, we will have a shop that presents the amazing history of glass in the Ozarks and that teaches and demonstrates how to make glass beads and that will be a place to buy those beautiful, sparkley treasures!!! Wow!

Yep, wow, what a week. Now Lena and I are headed out to do our weekly body score and FAMACHA check on the sheep and goats and to move the first batch due to lamb into the pen closest to the house. The weather is still beautiful and I'm going to enjoy the day and leave the worries about the future to the future.
love and hugs to all - Jen


Thursday, January 27, 2011

It's baaaacckkk!


I should be able to go back to doing daily updates here now, and get back to doing etsy listings in the Common Threads store.
And hopefully my cute little red netbook will let me keep working in cyber world.
The kitty is not happy though. She is currently curled up on one of my legs, while the netbook is on the other and she is certain that if she keeps pushing, the netbook will go away.

Saturday, January 15, 2011

How much yarn will this wool make?

You have mastered your drop spindle and now you are looking at that beautiful wool roving. All those gorgeous colors and textures! But how can you figure out how much fiber you need?

Many people ask us the question - how much yarn will this knot of roving make?

That question is hard to answer, it depends on how much roving is in the knot, the fiber, how well it is prepared and how evenly you spin. But it is possible to approximate how many yards you can spin from one ounce of roving.

You can use this guide as a basic outline.
WPI means Wraps Per Inch. Wind your yarn around a regular wooden ruler and see how many wraps there are in each inch. I wrap several inches and take an average.

If you spin: 
Worsted Weight Yarn {12 WPI} You will get: 56 to 75 yds/ounce
Bulky Yarn {10 WPI} 38 to 50 yds/ounce
Sport Weight Yarn {14 WPI} 75 to 113 yds/ounce
Fingering Weight Yarn {16 WPI} 119 to 150 yds/ounce
Lace Weight Yarn {18 or more WPI} 163 + yds/ounce
Very Bulky Yarn {8 or less WPI} 25 to 31 yds/ounce


If you are interested in reserving a 2011 fleece, visiting our farm for Shearing Days on March 29-31, 2011  or have other fibery questions, just send me an email or comment here.

Guide ID: 10000000002565815Guide created: 12/26/06 (updated 12/05/10)

Friday, January 14, 2011

Learn to weave on a triangle loom

Weaving on a triangle loom or triloom is fun, creative, easy and quick. You can start weaving as soon as you sit down with the loom, there is no elaborate planning and measuring process. Triloom weaving is also a very efficient way to use yarn, so you can use the more expensive designer, or hand-spun yarns. Triangle looms are great for weaving plaid patterns and elegant lace patterns. The process is simple to learn, so triangle weaving is enjoyable for adults and children of any age.

Using a triloom, you can weave a wide variety of yarns and patterns which can be used for shawls, purses, blankets or what ever you can imagine. Smaller trilooms can be carried with you in your purse or briefcase so that you can work on projects on the bus or during breaks. You can then piece together the small triangles into squares, rectangles, circular geometric shapes or bigger triangles, allowing you to form the fabric for jackets, shawls, blankets, hand bags or what ever your imagination prompts.

Triloom weaving uses one continuous strand of yarn. There is no separate warp and weft. To make a pattern, you tie the new thread onto the old one and continue weaving. This saves an infinite amount of time, since you don’t have to measure out your warp and then thread the loom. It also saves a lot of yarn, since there is no loom waste. Triweaving takes the drudgery out of the weaving process and leaves the fun!

Begin: To begin weaving on a triloom, start with a smaller loom, a 12-inch loom is ideal. Shawn makes beautiful ones. You can reach him through his Laffing Horse Crafts web site. A triloom with a wider spacing is good, so that you can understand the yarn flow without getting stuck. Look for a loom with a 1/2 to 1/3 inch nail spacing on the top row.

You also need a weaving hook. For a 12-inch triloom, a nine-inch crochet hook, known as an afghan hook is a great weaving hook. You can also use a latch hook, similar to the ones that you use for making latch hook rugs. Some of the trilooms come with their own weaving hook. The ones we make do come with their own hook.

Start with two contrasting yarns. A bulky wool hand spun is a great yarn for your first project. You need less than 50 yards, total, to make a small handbag on your triloom. You can also use bulky commercial yarns to start out. There is an incredible variety of yarn available. Search etsy or visit my Common Threads store for just a few examples.

To start weaving with your triloom, sit at a table, with your loom in front of you. Later, you can triweave with your loom on your lap, but for this first time, it is easier to have the table to set the loom on. Have your yarns, hook and scissors within arms reach.


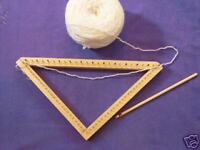
Set the loom on the table so that the long side of the triangle is farthest away from you and the point is nearest your belly. Pick up your first color of yarn and tie a slip knot in the end.

Hook the loop of the slip knot over the nail at the top left of the triloom. Run your yarn below the nails along the top of the triloom. Loop the yarn under the nail on the far right side of the top arm, then over, around and back down to the first nail on the right arm of the triangle.


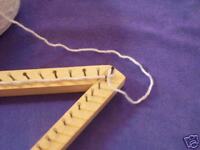
Loop it under that nail, and then back across the length of the loom to the left arm of the triangle. Loop under the first nail on the left arm of the triangle and then take your yarn up to the second nail on the left side of the long arm of the triangle. Go over that nail.


Keep your work loose, it will tighten up as you weave.

Now comes the tricky part, and this is where you start weaving. Woven fabric holds together because the threads are intermeshed by going over and under each other. As you weave on your triloom, you need to make sure that if one pass of thread was over the cross thread, the next needs to be under it.


So take your yarn, and from the second nail on the left hand side of the top arm of the triangle, go under the first long strand of yarn and over the second one. Then hook your yarn under the third nail on the left arm of the triangle. Keeping your loop of yarn below the previous strands, pull it across the loom and hook it under the third nail on the right arm of the triangle.


Now, look - the weaving that you did on the left side, is also carried through to the right side! This is the secret that makes triloom weaving go so fast. The first time my husband saw that and understood it, he said “That’s cheating!”

The starting process can be confusing, but don’t worry, you’ll get it. After doing it a time or two, you won’t even have to think about it. Read the description and then look at the pictures. If you have any questions, feel free to send me an email. I am always happy to answer questions.

Hook the yarn over the third nail on the right side of the top arm and using your weaving hook, go under the third cross yarn, over the second and under the first, pull your yarn down through the cross yarns and hook it over the fourth nail on the right arm of the loom. You can use the back of your weaving hook to push the yarn straight. Now you continue the back and forth and up and down weaving until your loom is almost full. Keep your work loose!


When you get the the center of the triangle, it will be hard to work the hook in, even if you left the tension of your yarn fairly loose as you were weaving.


As you round the last nail on the top arm, pull your loop down and around the center bottom nail. Pull the yarn out an extra two or three inches. Then snip the yarn and pull the tail back out the top.

You did it! You just wove your first piece on a triangle loom! To take your weaving off the loom, you just gently pop it off the nails. Because you wove, over and under each strand, your piece of fabric is complete and does not need any finishing to keep it together. There are fancy ways you can finish the edges, or you can use them to join two triangles together. I’ll explain how to do that after you weave your next triangle.

You just did your first piece without changing colors. Now, start a second piece, and weave down to the sixth nail. As you come around the top arm nail on the left side, take your yarn and just lay it over your weaving down to the nail on the left side arm. Measure about 3 more inches and then cut your yarn. Tie on the second color. Now, take your hook and continue weaving as usual. The knot where you joined the colors should be on the outside of the nail on the left arm. When you decide to change colors again, keep the knots on the bottom edges. This way you can hide them in the fringes or in the joining.

Finish your second triangle and take it off the loom. Take time to admire your work!

To join the two triangles, lay them down, matching each other, with your beginning threads at opposite sides. Take your weaving hook and pull the beginning thread of one triangle through the beginning loop of the other triangle. Then, crossing from on triangle to the other, hook the next loop through and then the next loop. Think of binding off when you are knitting, or making pot holder edges on a pot holder loom. When you get to the opposite side, pull the end thread out through the loop.

Congratulations, you have a square!

If you make 5 triangles, join them into 2 squares and then stitch three sides of those squares together and join the fifth triangle at the top, you have a beautiful little, unique handbag. Or make triangles for the rest of the summer on your morning commute and by Christmas, you’ll have enough to join together to make scarves or afghans for everyone on your gift-giving list!

Guide ID: 10000000001243078Guide created: 06/27/06 (updated 11/11/10)

Thursday, January 13, 2011

Warp your rigid heddle the easy way

Warping a loom is one of the most tedious parts of weaving, but with a rigid heddle loom, it isn't complicated. Using a warping peg and warping directly to the loom, you can have most projects ready to weave in an hour.
Start with a simple project and use inexpensive thread or yarn. Then you don't need to calculate how much yarn you need. For those of you who like to figure, I will include some length calculations, if you don't want to count it, just gather a bunch of yarn :-)

Using a 72 inch scarf as an example, you would need 96 inches of warp yarn, times a 10 inch width, woven on a 10 dent reed - means you need 9600 inches of yarn for your warp - or 267 yards. If you want half white and half another color, then you'll need 134 yards of each color. Not bad, when you put it in yards. You will need an approximately equivalent amount for the weft, the cross yarns you weave in.

In addition to the yarn, you need a rigid heddle loom, these are often available online. Just search rigid heddle loom to find looms usually listed from $9.95 to $500. The loom should have a heddle, braces, 2 brakes, front and back beams, a warp beam and a fabric beam. If you have any questions whether or not a loom is complete, feel free to ask me via a comment here or an email. 

In addition to the loom and yarn, you need 
  1. scissors, 
  2. a tiny crochet hook or heddle hook, 
  3. a table or stand to put the loom on, 
  4. clamps of some sort to hold the loom on the table and 
  5. a stable peg that you can have a set distance from the loom. 
My dining room chairs have spindles on the top. I weight those down with a bunch of books and use them, because they are handy. Some looms come with a warping peg or a stair bannister works. You just need something upright that you can drop a loop of yarn over and that will hold the yarn for as long as it takes you to warp the loom. This time factor generally leaves husbands and children out of the equation!

Find the center of your rigid heddle. This is usually marked on used looms. If it isn't marked, you'll need to find it by counting the slots. Tie a thread through the slot and around the top of the heddle to mark the center, or mark it with a pen. Now, measure 5 inches from the center to each side. Mark these slots with threads. This will give you the 10 inch width for your scarf.

Start with the back of your loom at the edge of the table. The front of the loom faces the peg/chair on the other side of the table.
  1. Clamp the loom to the table and set your peg 96 inches away from the back beam of the loom. 
  2. Set your first ball of yarn on a chair below the loom, or on the floor. 
  3. Tie the end of the yarn to the warp (back) beam of the loom.
  4. Using your heddle hook pull a loop of your yarn through the slot marked as 5 inches from the center. You can go either to the right or left, which ever is more comfortable for you. 
  5. Take that loop of yarn across the front beam of the loom. Don't do anything with this beam yet
  6. Pull the loop all the way to the peg and drop it around the warping peg.
  7. Go back to the warp beam and pull a loop of thread from the cone, around the back beam and through the next heddle slot.
  
Continue across the heddle, pulling a loop of thread up from the cone on the chair, threading it through the next slot and drawing the loop down to the warping peg. The loops will go over the warp beam and then under the warp beam. 
When you have threaded all the slots from your beginning thread to your ending marker for a total of 10 inches, cut the thread several inches past the back warp beam. Tie the end of the thread to the beam.
Now, carefully slide the warp threads off of the peg. Begin winding the warp onto the back beam by turning the beam or knobs attached to it. When the threads start winding onto the beam, you will need to put paper, newspaper, cardboard or some other paper on the beam, under the threads. This is to separate the layers and keep the tension equal.

When you have the warp wound on the back beam and there is about 8 to 12 inches left in front of the heddle, STOP. Set the brake and turn the loom around. For the next step, you need scissors and it is easier to finish warping while you are seated.

Take a good look at the loom in front of you. There are two threads going through each slot. Next to each slot is a heddle with a hole in it. For the weaving to work, half the threads have to go through those holes. 
 

Pick up your warp threads, take your scissors and cut the ends of the loops. With your heddle hook or small crochet hook take one thread of each pair and pull it through the hole. This is much easier to do than it is to explain. Feel free to print these instructions and try to work through this process. If you have any questions, send me a message. 

When you have one thread through each slot and hole in your ten inch weaving width, you are ready to tie on. Pick up the first 4 threads in one hand and the next four in the other hand. Pull the threads over the cloth beam, around, under and then up over and tie them together. Just use a single, over hand knot, so that you can tighten the threads in the next step. Again, this is easy do, just hard to explain.


When you have all the threads tied on with a single knot, check the tension on them and tighten them where needed. As you tighten, knot the threads again, making a double knot in each bundle. Begin winding the cloth beam forward, This will tighten the warp further. Check for any missed slots, or holes or crossed threads. This is your last chance to correct warping mistakes.

Raise and lower the heddle. Check your warp threads again to make sure the tension on all of them is even. 


Take some sheet fabric, tee shirt material or even paper towels. Raise your heddle and set the material in. Pull your heddle forward to beat the fabric tight. This is spacer fabric, you will pull it out when you cut your scarf off the loom. It evens out your warp and will spread the gaps from the tie on. Lower your heddle and weave and then beat the next pass through.


This raising and lowering is how you create your weaving. You raise the heddle and put your weft through from one side. Then you lower the heddle and run your weft back through from the other side. You beat your fabric tight with the heddle between each pass. Weave in 3 or 4 rows of spacer.  Look how the space fabric is woven through the warp threads.


Now, wind your weft yarn onto your shuttle. I like to wind mine on in a butterfly pattern. Then it comes off easier when you are weaving. Wind on as much as you are comfortable handling. Remember, you will need to slide it through the gap between the slot threads and the hole threads. This gap is called a "shed"


Run your shuttle through your through the shed, leaving the end of the yarn hanging out several inches. Beat the weft yarn in, then change your heddle position. Tuck the end of the weft yarn in and run the shuttle back through. Keep your edges loose and leave your weft thread in an angle. Beat it down. This raise heddle, run the shuttle through, beat, lower heddle, run shuttle through, beat, is the basic pattern for your weaving. There are many good books out there that explain this process in detail and have wonderful patterns for weaving.

Congratulations - you've warped your loom! Happy weaving!


Guide ID: 10000000001572825Guide created: 08/22/06 (updated 12/19/10)

Tuesday, January 11, 2011

The rest of the meal

Computer issues are so crippling in our modern world. Shawn was up until 3 am this morning with tech support, (thank you, so much!) trying to fix my dear little netbook. So far, it seems to be working.

We had a bit of snow and the roads are a bit icy here in town. Not so bad here, but I hear the rest of the state is pretty snowed under. I don't know if my class will be able to make it to the Folk Center today, and I have left messages for all of them offering to postpone the class 'til next week, but haven't heard back. So here are the rest of the recipes, tested in our farm kitchen this weekend.

Corn meal mush

I cup corn meal (your choice of color)
1 cup cold water
1 tsp salt (optional)
3 cups hot water

Put the hot water and salt on to boil in a 2 quart pan with a heavy bottom. In a bowl, thoroughly blend the cold water and corn meal. Pour the cornmeal in over the water and stir with a wire whisk. When the hot water starts boiling whisk the blended cornmeal into the hot water. Continue to stir until it comes back to a boil. When boiling, remove from heat. Let stand 10 minutes. Eat with your favorite topping - cheese, sorghum, honey, salsa - can be eaten for any meal, as a main course or side dish.
Pack the leftovers into a well greased bread pan, refrigerate. The next day, turn the mush loaf out onto a bread board, slice and fry in bacon grease for a real treat.


Ham and Beans
We get the best ever ham hocks from the Mountain View Meats on Hwy 66.

2 1/2 cups dried beans
6 cups water
2 ham hocks
2 tsp butter
4 cups water

Rinse beans well, pick out stones. In large, heavy bottomed sauce pan combine beans and 6 cups water. Bring to boil and simmer for 10 minute. Remove from heat, cover and let stand 1 hour. Drain and rinse beans and return to pan.
Add remaining 4 cups water, ham hocks and butter to beans. Bring to boil and reduce heat. cover and continue to simmer for up to 2 hours, stirring occasionally until beans are tender. Add more water when needed.
Remove hocks from beans cool slightle and slice off meat. Return meat to beans, stir and serve.


Corn bread

1 cup flour
1 cup corn meal
1 tablespoon baking powder
1/4 teaspoon salt
1/4 teaspoon baking soda
1 egg
1/2 cup butter
2 tsp honey
1 1/4 cup buttermilk

In a large bowl, combine the dry ingredients and blend well.
Put a large skillet into the preheating oven at 375 degrees with the butter.
In a small bowl, whisk together the egg, buttermilk and honey.
When the butter has melted, pull the skillet out of the oven and swirl around to coat thoroughly. Then pour the remaining butter into the liquid mixture. Blend well and then pour into the dry mixture, stirring as you pour.
When completely blended pour into skillet and bake about 25 minute or until cornbread is pulling away from edges of the pan.
Cool slightly, cut and serve warm with ham and beans.


Meat stew
16 - 48 ounces meat (in our house this is goat or lamb, traditionally it would be venison. It can, of course be made with beef or pork or bear or coon or...)
Tblspn Lard or butter
2 Tblspn Flour
Potatoes
Carrots
Onions
Sweet potatoes
Dried green beans or any other vegetables in the root cellar.
4-6 cups water

Chop the meat into one inch cubes and put in large skillet or heavy bottom cast iron kettle with fat to brown. Stir occasionally while browning.
Chop all vegetables into one inch cubes. Peel the things you like peeled.
When meat is browned, stir in flour, sprinkling it over the top and blending well.
Add onions and carrots. Cover and let simmer for about 10 minutes, stirring occasionally.
Stir in water.
Add rest of vegetables, stirring often. Cover and let simmer 30 minutes or more until vegis are tender. Add salt, pepper and other spices to taste. This will vary depending on what meat, vegis and spices are available.

Spoon into bowls and enjoy with corn bread, biscuits or fresh baked bread.


These are basic settler foods here in the Ozarks. It's interesting that they are pretty basic foods in our modern farm kitchen in the Ozarks, too.

Sunday, January 09, 2011

Spinning Frappucino's first kid mohair fleece

Frappucino and his mum, Bramble


Carding Frappucino's kid mohair curls


Silky kid mohair in the cards


A batt of Frappucino carded kid mohair


Carded Frappucino kid mohair ready to spin

Mohair Spinning Philosophy and Basket Blends

Two skeins of Basket Blend Yarn
I love to spin mohair. The silky softness pleases both my hands and my eyes. It is a very sensual fiber.
And I love my little fluffy, floppy-eared goats who grow mohair. My colored angora goats seem to combine the best characteristics of the dairy goats that I've loved most of my life and the sheeps that keep me entertained while growing useful wool. And they grow that divine fiber -mohair.

I spin my mohair raw, from the lock, unwashed and often, uncarded. The prime parts of the fleece, off the side, I just spin directly from the pillowcase, where they've been stored since shearing. Sometimes the fleeces are stored for a day before I start spinning, other times it's four months, but I do spin almost all of my 10 mohair fleeces in the 6 months between shearing. Did I mention that I love to spin mohair.

Spinning mohair raw gives me a yarn that varies in thickness and has little tufts and nubs and tails. This makes  a wonderful, textured fabric when I weave with my handspun. It also creates fun, one-of-a-kind hats and scarves and shawls and wraps and blanket when I crochet with it.

After I spin each skein, I wash it in the sink. I rinse each skein in warm water and then wash them with soap. I then rinse them several times, usually once with vinegar water and sometimes I add creme rinse to the last rinse bath, depending on whether or not I plan to dye the skeins. The ones I am going to dye, I don't use creme rinse, because it affect how well the dye takes up.

I demo spinning frequently. During the summer, I do spinning demos several times a week. I carry my current fleece in a big grapevine basket, woven by Grapevine Betty who lives up on Highway 9 outside of Mountain View. I spin up all the best parts of one fleece before I get out the pillow case that has the next fleece. Or, sometimes I get bored spinning one fleece, so I'll go grab another with much of the original fleece still in the basket. After a few months, there is an interesting mix of mohair curls in my grapevine basket.

At some point, either because I don't have enough prime parts of a fleece left in the basket or because I want to empty it out, I start carding all the bits left in the basket together and spinning them. These are my "Basket Blends Yarns". They are 100% mohair all grown here on our farm. Our flock is mostly grey, in different shades. A few of them have white spots and Tillie is all white. Bramble and Frappucino are oatmeal colored with a steely highlight. So the undyed Basket Blends are grey/white/silver. While they have some kid mohair in them, they also have older does hair, however it is still soft to the touch mohair.

Ozark pudding and other winter treats

This area of the Ozark Mountains has not been settled for very long. Peoples have known about the bounty of the area - Indian tribes hunted it, Frenchmen trapped it, Spaniards explored it, but the rough ground, challenging access and fickle weather kept people from settling here until some intrepid British Ilse folk and German farmers began planting themselves here in the 1800's.

Getting in and out for food was possible, but challenging. Some menfolk would spend the entire year building a raft, trapping, collecting and harvesting. They'd take the rivers down to the Mississippi and on down to New Orleans, trading all the way down the river. Then they'd walk home, with what they'd bartered for and what they could carry. So, realistically - the settlers ate what they could hunt, trap, gather and raise. This was not a hardship, though it was a lot of work. This area of the Ozarks is rich in game. The valleys grow good crops. The streams and lakes are full of fish. The trees produce nuts galore and the bushes are laden with berries. Bees swarm in hollow trees and make honey from the sweet flowers. In the summer, there is lots of food. People who settled in the Ozarks were skilled at harvesting and storing it, or they didn't survive.

These recipes are adapted from old recipes I've heard from friends whose families settled here before the Civil War. I've changed them a bit to suit what is avialable to a modern cook, though I've tried to remain true to the idea of the time, like using stone ground corn meal and whole wheat flour.

The discussion of white corn meal versus yellow corn meal has occupied a goodly portion of my study for the last four years. People passionate about their corn meal. Some of the local ladies insist that white corn meal is "Yankee corn meal" and their mama's would never have used it. However, two settler families in the area, the Gillihan's and the Cross's both have always used white corn for meal and say that yellow corn is for feeding to livestock. Because I have a goodly supply of organic locally grown stone ground white corn meal from War Eagle Mill, that is what I have used in these recipes.

Also, I only use butter. I don't think that magarine is food. Lard is an acceptable cooking fat and preferable in many recipes. Both would have been available to early settlers.

Also, I don't eat processed sugar. I do occasionally eat a wee bit of honey and I love fruit for sweet treats. The early settlers would have done some trading for sugar cakes, but they would have mostly sweetened with dried fruits, homemade sorghum molasses and honey gathered from wild hives.

I am going to teach these six recipes in my Traditional Winter Fare Cooking Class on Tuesday, Jan. 11, 2011. It may take me a few days to get them all listed in here. The recipes are Corn Meal Mush, Corn Bread, Beans with Ham Hocks, Meat and Vegi Stew, Ozark Pudding and Cornmeal Skillet Cake.

Dessert first :-)

Ozark Pudding
Ozark Pudding (this is one of our family's favorites)

1 egg
1/3 cup honey
2 heaping Tablespoons Whole Wheat Flour
1 1/4 teaspoons baking powder
1/4 teaspoon salt
1 peeled and chopped apple
1/2 cup chopped hickory nuts (pecans are a modern substitute)

Preheat oven to 350. Butter a 10-inch pie plate or skillet.
Beat the egg and honey together. Add flour, baking powder and salt. Mix thoroughly. Fold in the apples and nuts and pour into the pie pan. Bake for 30 minutes, keeping the fire at a steady temp. Serve warm with  cream drizzled over the top for added decadence.


Cornmeal Skillet Cake
This recipe takes more time than Ozark Pudding, but it is worth the effort.


Cornmeal Skillet Cake

1 cup flour (I use War Eagle Mill White Whole Wheat)
1 cup white corn meal
1 1/2 tsp baking powder
1/4 tsp salt
8 Tablespoons butter
4 apples, peeled and cored and chopped
1/2 cup honey
1/2 cup chopped hickory nuts
1/2 cup dried berries
1 cup milk
2 eggs

Preheat oven to 350. Mix together flour, cornmeal, baking powder and salt.
On stove top, melt butter in skillet. Add the apples and simmer until soft. Add the honey, berries and nuts and stir well. Remove from heat.
Beat the eggs and add the milk. Pour into the dried ingredients and blend well. Pour the liquid off the apple mixture into the batter and blend well.
Spread the apple mix evenly over the bottom of the skillet and then spoon the batter over the top. Smooth it out to cover the fruit.
Bake for 30 min, or until a knife comes out clean.
You can serve from the skillet, or invert on a cake platter for a more stunning presentation.


Saturday, January 08, 2011

Shearing week

The sheep and dairy goats in the back, waiting for their breakfast.
We are currently planning a Shearing week at our farm in the Arkansas Ozarks March 29-31, in conjuction with Sheep Camp at the Ozark Folk Center. Send me a message if you want more information about classes, demos, work-study opportunities or reserving fleeces.

Friday, January 07, 2011

Catching up

The trip to Colorado was great, but I have so much catching up to do!
Shawn found us a new-used fridge and in the process of changing them, we had to take down our favorite cartoon. It's now up on the new fridge. Thanks again Julia!

We fence our critters,
 but have Wifi for the computers!

I got my first of the month reports mostly finished at work (I still have one due on Monday) and so I took today off. I am cooking and prepping for the class I am teaching on Tuesday - Winter Foods. Currently I have a pot of beans with delicious ham hocks from our local butcher on the stove. I'll start a batch of corn bread in the skillet when I get done writing this. I made both yellow and white cornmeal mush for breakfast this morning and tomorrow I'll do a winter meat stew with kale from the garden. I'll do an Ozark pudding and an apple cornmeal cake tomorrow. As soon as I write down and test all my recipes, I'll share them here! It's a wee bit of a challenge to work on cooking classes, since I quit eating sugar last August, but I work around it with fruits and a wee touch of honey when I need to.

I've been spinning in the evenings this week and just washed the 5 skeins I did. I'm spinning Frappucino's kid mohair fleece right now - it is divine! Not as pretty a color as his sister's, but just a soft and fine and strong.


I've done one skein plied with space dyed soft rose, yellow and tan yarn. I did two skeins that are 100% Frap and then I did two skeins of my "basket mix" which is the rest of the mohair left in my basket after I finish spinning individual fleeces. This basket mix has Bramble's, Abra's, Fes' and Eve's fleeces in it. It's no where near as fine as kid mohair, but it is still wonderful yarn.