Showing posts with label 52 things to do with an old shirt. Show all posts

Friday, June 07, 2013

Garden ties - more of 52 things to do with an old tshirt

And then there are the little bits left over
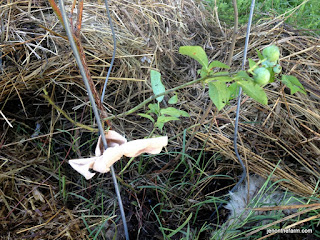
As I was mulching the baby blueberries and giving them some more of the wonderful used coffee grounds that they love, I could see that a few of them could us some help staying inside their supports. But they are delicate little baby blueberries. Baling twine would be too rough, ziplock ties too hard, cotton string too cutting fine.
Then I thought about the tshirt scraps left on my cutting table from the bag I'd just made. The perfect wide, soft, gentle blueberry ties.
The berries are hitting pink blush stage right now. Just another week... or two. I'll have a hard time sharing this year. After all, a plant that thrives on coffee grounds has got to be MY plant. And since I only buy fair trade, organic, shade grown coffee, I am very happy to share the grounds with my blueberry plants.

The strawberries have been giving me about one ripe berry an evening. Makes for a sweet reason to check the garden when I get home from work. Leesa's blackberries are getting huge. They'll be about the size of plums! But they are still green.
The black raspberries are ripening a few a day... and I have shared some of them with Shawn and Lena. They are delicious.
Tshirt soft - the best garden ties for baby plants.
I can't decide whether or not to let this year's little elderberries make berries. They have flower clusters, but I want them to establish roots, so I think I'll trim them back this year.
Maybe now that June is here and work is less frenetic, I'll have time to keep ya'll updated with things here on Havencroft Farm.


Sunday, March 11, 2012

52 things to do with an old shirt #5 - Crochet a Quart Cozy


I've decided the best way to cut shirts for crocheting is to
spiral up the shirt from the bottom, after cutting off the hem.
I'm saving the hems, etc., for stuffing material. Just keep going
around the shirt, cutting about a 1/2 inch wide strip and rolling
it into a ball.


A sized P crochet hook works best for crocheting most
tshirt rags. Shawn carves and sells these on his
website at laffing-horse.com
 I love to drink water. And my favorite water bottle is a quart glass jar. They feel right in my hand, hold enough water or coffee that I don't have to fill them all the time, and I can see that the jar is clean.

But they do break and in the summer, condensation builds up on the outside of the glass. And they can be a challenge to carry when you hands are full.

So, I designed and created the Quart Cozy.
Cut a t-shirt or turtle neck into a 1/2-inch wide strip. I spiral cut around the body and work my way up the shirt from the bottom. I do it in one long piece, so that I don't have any joins. This is a good project to do in front of the tv at night when you are tired.

To crochet your own Quart Cozy, use a size P crochet hook. Shawn makes these great wooden ones. You can find more on his web site at Laffing-horse.com.

Make your center loop with a draw tight. Crochet 12 single crochets into the center loop and then draw it closed.
A finished Quart Cozy soaks up condensation, gives me a
handle to carry my water bottle and cushions the jar.
Chain three, turn your work and single crochet in the top of the next sc, chain one, sc in the next sc, ch one on around. Slip stitch in the beginning chain.

Now, staying on the same side of your work, chain 2 and sc around the post of the sc in the base. sc around the post of each sc and slip stitch into the beginning chain. Chain 2, turn your work, sc in the top of each sc around the cozy. Continue to 8 rows. Turn, chain 1.
Slip stitch in the top of each sc.

Chain 15, sc in the opposite side of the cozy to form the handle. Slip stitch back across the handle. Anchor well with another slip stitch. Weave the end into the body of the cozy.

Wash with your regular laundry.


Sunday, February 19, 2012

52 Things to do with an old Shirt - #3 Make an Ozark pincushion

Rene' Riggan's applied felting class was the one class that
did not require a sewing machine.
We just wrapped up our Ozark Quilt Retreat for 2012. It was the best ever with 36 ladies in six classes -  quilting, talking and sharing fun!
I wanted to do something special for my Quilt Retreat teachers. It's February, so we are short on funds and there is a lot going on at work, so I am short on time. To top it off, we are starting into lambing and kidding time at home, so...
Now, I'm not a quilter myself, but both my parents are, and most of my friends are. They assure me that "Quilters collect pin cushions." Thinking that it was way beyond time to write another 52 things to do with an old shirt - I set out to design a pincushion for my quilting teachers.

Select a shirt from your box of old shirts.
 Silk and wool are a good combination for a pincushion. Together they will clean the pins and keep them from rusting. Silk shirts are comfortable to wear, but they do seem to wear out fast. I have a lot of them in my Shirts to Rework bag. Some just have stains or fading, others have tears. I pulled out one in very bright colors.

Gather shirt, scissors, wool, yarn, glue, a canning jar with
metal ring lid.


Cut out a square of the silk, about the siize of your hand. Cut a second section, a little smaller and irregular shaped is ok. You'll use that section to wrap the wool up into a ball. Then lay the square of silk top-side down on the table.Put your silk wrapped ball of wool in the center of the square.Pull the corners up and wrap a piece of yarn around them. Tie it tightly. Now you have something that looks kind of like a big shuttlecock for badminton.

Take an old ring of a canning jar lid and pull the tails of your silk ball through the ring. Put glue all around the top of the ring and mash the ball down into the ring.
Let it dry, then flip it over and trim the tails to make a cute rosette.
Put your pincushion lid on a clean pint canning jar and Voila' - you have an Ozark Pin Cushion.
Cut your outside wrapping piece a bit bigger than hand-sized.
Cut a second piece to wrap your wool in.
Thanks again to all the wonderful quilt ladies who gave me such a fun week!


Put your silk wrapped wool into the larger square of silk,
pull up the corners and tie with yarn.

Put any good, allpurpose glue on the top of the ring
lid and set it over the silk ball, with the tails coming
out the bottom. Mash it down so the glue sticks.
Trim the tails to make a neat rosette.


When the glue is dry, put the lid on the jar
and, you have your Ozark pincushion!